Excel 2013 is a versatile program that makes it easy for you adjust the data that is contained within your worksheet cells. Many Excel users may focus primarily on the data that they have entered in their cells, but the physical appearance of that data can be just as important for your readers. If you are editing a worksheet in Excel 2013 and find that a font is difficult to read, then you may decide to change the font of the entire worksheet. This can be difficult if you manually select all of your cells, especially when working on a large file. Fortunately, you can quickly select an entire worksheet and make edits to all of your cells at once, which allows you to quickly perform certain tasks, such as changing the font of the entire worksheet.
How to Change the Worksheet Font of an Entire Worksheet in Excel 2013
Our guide continues with additional information on changing the font for every cell in Microsoft Excel, including pictures of these steps.
How to Change the Font in Every Cell in Excel 2013 (Guide ith Pictures)
The steps below will assume that you want the font to be the same in every cell of your Excel 2013 worksheet. The steps below may not work if the worksheet that you are editing has been locked or restricted from editing. If the worksheet is locked, then you will need to get the password from the original author of the document to make edits.
Step 1: Open your worksheet in Excel 2013.
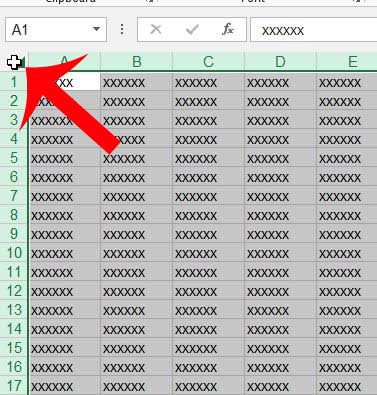
Step 2: Click the button at the top-left of the worksheet to select every cell.
If you only want to change the font in some cells, then you will need to manually select the columns or rows that you want to edit.
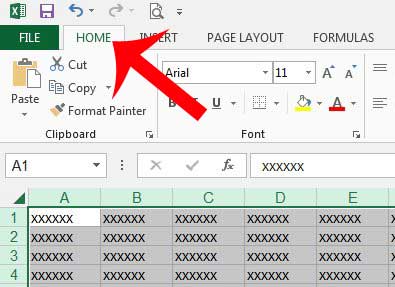
Step 3: Click the Home tab at the top of the window.
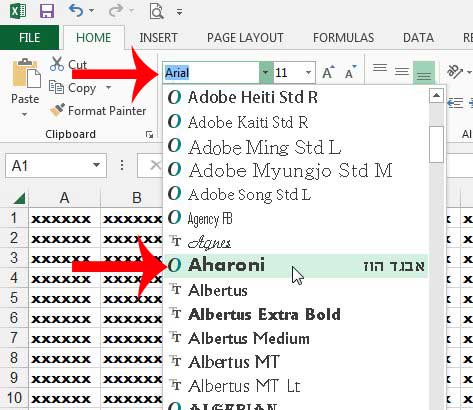
Step 4: Click the Font drop-down menu in the Font section of the navigational ribbon, then click the font style that you want to use.
You can also change the font size and color while all of your cells are selected if you would like to adjust those settings as well. Our guide continues below with more information on selecting and changing the font in an entire Excel worksheet, including how to perform this action on every sheet in your workbook.
Can I Set a New Default Font and Font Size in Microsoft Excel?
Microsoft Excel also has a menu where you can select the default font that you want to use for new workbooks. You can find this by clicking the File tab at the top-left of the window, then select the Options button at the bottom of the left column. This opens an Excel Options dialog box. Select the General tab at the left side of the Excel Options window, then click the Use this as the default font drop down menu and select the desired font. You can also click the Font size box at this point and select a different size if you prefer. You can then click the OK button. In most newer versions of Microsoft Excel the default font settings will include the Calibri font and the 11 point font size. But if you wanted to use a font like Times New Roman or Arial, or if you want to increase font size to 12 or 13 point then you are able to proceed with changing font type and text size to apply those settings to future Excel sheets. The other options in the When creating new workbooks section of this menu include a Default view for new sheets and an Include this many sheets option. This allows you to decide which view type you want (Normal, Page Break Preview, or Page Layout View) for new Excel files, as well as the number of worksheet tabs that are included when you make new Excel files. You may need to restart Excel if default changes that you have made aren’t applying to the current sheet. Note that when you change the default font in Excel it will only apply to Excel. Other Microsoft Office applications like Word or Powerpoint won’t be affected. Existing workbooks will continue to use the font type that was set when that workbook was created.
More Information on How to Change Font in Excel 2013
The steps in our guide above show you how to select all in Microsoft Excel, then apply a new font to that selection. However, you might discover that you have some discrepancies between the appearance of some of your fonts, as they may have different font sizes or different font colors. This is common if you have copied and pasted information from a number of other sources. One option that is available involves clearing the formatting. To do this you will need to select all of your cells again, click the Home tab, then click the Clear button in the Editing group of the ribbon and select the Clear Formats option from the dropdown menu. This removes all of the formatting options that have been applied to a cell, which should make all of the data in your cells look the same. Typically this will restore that text to the default font style, font color, and font size. You can also select all of the cells in your worksheet by clicking on one of the cells, then using the Ctrl + A keyboard shortcut. If you want to select individual cells you can hold down the Ctrl key on the keyboard, then click each cell that you wish to modify. If you want to change the font for an entire workbook, which is every worksheet tab in the Excel file, then you will need to right-click on one of the worksheet tabs at the bottom of the window and choose the Select All Sheets option. Now any action that you perform on one of the selected worksheets, such as changing the font for the entire sheet, will also be applied to the other worksheets in the workbook. Another way that you can adjust fonts in a spreadsheet involves the use of Cell Styles. Your Excel worksheets have a default style that is applied to that worksheet. If you select a cell range, either with your mouse or by using the Ctrl or Shift key, then you are able to apply the desired style to that range by selecting the Page Layout tab at the top of the window, then clicking an option in the Themes group of the ribbon to apply it to your selection. Would you like to change the font that is used in Excel whenever you create a new workbook? This article will show you how to set your default font in Excel 2013.
Additional Sources
After receiving his Bachelor’s and Master’s degrees in Computer Science he spent several years working in IT management for small businesses. However, he now works full time writing content online and creating websites. His main writing topics include iPhones, Microsoft Office, Google Apps, Android, and Photoshop, but he has also written about many other tech topics as well. Read his full bio here.
You may opt out at any time. Read our Privacy Policy


