But if you are new to Photoshop, then the layout and the tools can be confusing, making it difficult to locate some of the most important functions that you need to use. So if you have a picture on your computer and you want to change the dimensions of that image, you can follow our steps below.
Changing Dimensions of a Picture in Photoshop
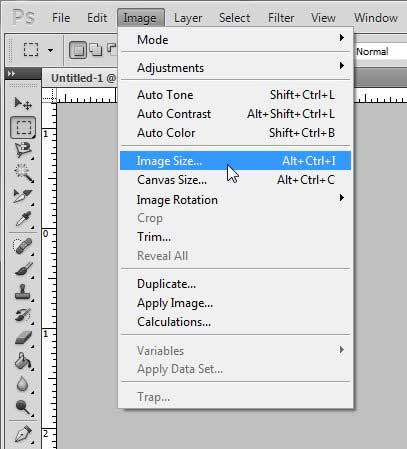
The steps below were performed in Photoshop CS5. The process is similar in other versions of Photoshop, but the screens may look different. If you want to update to Photoshop CS6, the most current version of the program, you can purchase it here. Note that increasing the dimensions of an image can cause the image to become pixelated, as the resolution of the original image cannot be increased. Step 1: Open your image in Photoshop. You can either right-click the image, click Open with and select Photoshop, or you can launch Photoshop, then click File > Open. Step 2: Click Image at the top of the window, then click Image Size.
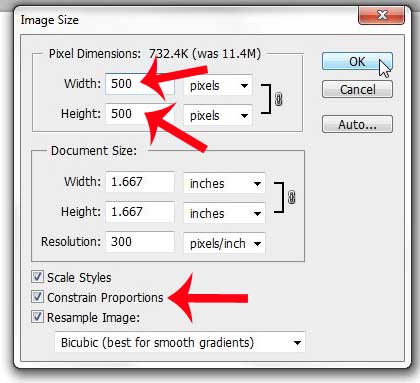
Step 3: Enter the desired image length or width into the appropriate field. Make sure that the Constrain Proportions box is checked at the bottom of the window so that the image scales properly. Click the OK button to change your image dimensions.
Do you need to reduce the file size of an image in Photoshop? This article will show you several modifications you can make to a file that will help to make the file size smaller. After receiving his Bachelor’s and Master’s degrees in Computer Science he spent several years working in IT management for small businesses. However, he now works full time writing content online and creating websites. His main writing topics include iPhones, Microsoft Office, Google Apps, Android, and Photoshop, but he has also written about many other tech topics as well. Read his full bio here.
You may opt out at any time. Read our Privacy Policy